Sometimes, you will encounter data that best fits in a tabular format. Tables are a versatile tool for presenting data in a structured and visually appealing manner. HTML offers support for presenting data in a tabular format. In this section, we'll delve into how to organize information with HTML tables.
Defining Tables
HTML tables are defined using the <table></table> pair. You structure your table row by row, and the elements within each row determine the number of columns. It's important to ensure that each row contains the same number of elements to maintain consistency.
By default, tables do not display borders in most browsers. If you want to visualize the table's structure, you can use the border attribute, like this: <table border="1">. While this method provides basic borders, CSS offers a more flexible and powerful way to style tables.
Adding Your First Row
Once you've defined a table, the next step is to add rows. Each row is enclosed by <tr></tr> tags. In many cases, the first row of a table serves as the header row, containing labels for the data. These header cells are typically formatted with <th></th> tags to distinguish them from regular data cells.
Note that headings don't have to be on the top row. If you want headings on the left, just put a <th></th> pair as the first element of each row. While you can have headings anywhere, it usually makes sense to put headings only at the top or left.
<tr>
        <th>Product</th>
        <th>Price</th>
        <th>Availability</th>
</tr>
Creating Data Rows
Data rows in your table are structured similarly to header rows, but they use <td></td> pairs to enclose the data elements. In a standard table, you might have blank rows as placeholders for content.
<tr>
        <td>Musa</td>
        <td>25</td>
        <td>Kaduna</td>
</tr>
<tr>
        <td>Eze</td>
        <td>30</td>
        <td>Lagos</td>
</tr>
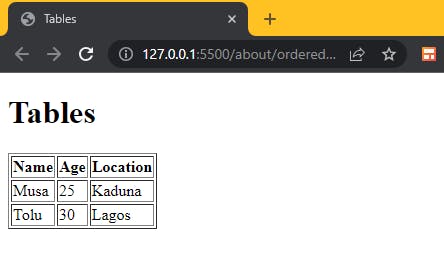
Let's create the complete table using what you've learned about tables.
<!DOCTYPE html>
<html lang="en">
  <head>
    <meta charset="UTF-8" />
    <meta name="viewport" content="width=device-width, initial-scale=1.0" />
    <title>Tables</title>
  </head>
  <body>
    <h1>Tables</h1>
    <table border="1">
    <tr>
        <th>Name</th>
        <th>Age</th>
        <th>Location</th>
    </tr>
    <tr>
        <td>Musa</td>
        <td>25</td>
        <td>Kaduna</td>
    </tr>
    <tr>
        <td>Tolu</td>
        <td>30</td>
        <td>Lagos</td>
    </tr>
  </table>
  </body>
</html>

Structuring Tables with Section Elements
Sections help improve the structure and accessibility of your HTML tables, especially when tables are long or complex. HTML provides <head>, <body>, and <tfoot> which are used to group and structure different parts of an HTML table. Specifically:
<thead>: is used to group the header content of the table. It typically contains row(s) with header cells,<th>that describe the columns of the table. These headers provide context for the data in the table.<tbody>: contains the main data of the table. It includes rows with data cells,<td>that present the actual content or information.<tfoot>: is used to group the footer content of the table. It usually contains row(s) with footer cells that summarize or provide additional information related to the data in the table.
Spanning rows and columns
Sometimes, you need a little more flexibility in your table design where you need to merge cells or create table cells that span multiple rows or columns. The rowspan and colspan HTML attributes are used to create such complex table layouts.
Rowspan Attribute
The rowspan attribute is used to specify how many rows a table cell should span vertically. It allows you to merge cells in the vertical direction, creating a visual grouping of data.
Colspan Attribute
The colspan attribute is used to specify how many columns a table cell should span horizontally. It allows you to merge cells in the horizontal direction, creating wider cells.
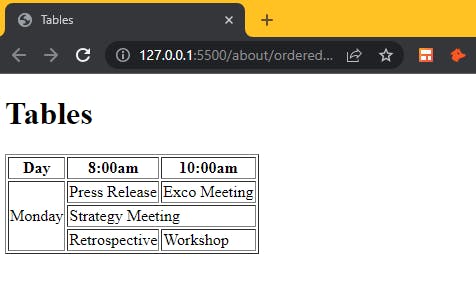
The code sample below demonstrates how to use rowspan and colspan attributes.
<!DOCTYPE html>
<html lang="en">
  <head>
    <meta charset="UTF-8" />
    <meta name="viewport" content="width=device-width, initial-scale=1.0" />
    <title>Tables</title>
  </head>
  <body>
    <h1>Tables</h1>
    <table border="1">
      <tr>
          <th>Day</th>
          <th>8:00am</th>
          <th>10:00am</th>
      </tr>
      <tr>
          <td rowspan="3">Monday</td>
          <td>Press Release</td>
          <td>Exco Meeting</td>
      </tr>
      <tr>
          <td colspan="2">Strategy Meeting</td>

      </tr>
      <tr>
          <td>Retrospective</td>
          <td>Workshop</td>
      </tr>
  </table>
  </body>
</html>
The output is attached below as well.

What You've Achieved!
In this part, you've gained valuable insights into structuring and organizing information using HTML tables. You've learned how to define tables, create header rows and data rows, and use rowspan and colspan attributes to create complex table layouts. You're now well-equipped to present data effectively on web pages and create visually appealing table structures.
Next in the Series: Striking Connections with HTML Link
In the upcoming installment, we will explore the fundamental concept of hyperlinks in web development. You'll discover how to create links to other web pages, external resources, and within the same page. Stay tuned as we delve into the world of hyperlinking in HTML!

